Friday, June 23, 2017

Windows Server 2016 - FRS Deprecated: How to migrate SYSVOL replication from FRS to DFS replication

This blog contains a step-by-step guide: “how to migrate the SYSVOL FRS to DFS Replication (DFSR)”

Windows Server 2016 Domain Controllers: FRS Replication deprecated!

Since the introduction of Windows Server 2008, Microsoft moved away from FRS replication and introduced DFS replication for SYSVOL. With the introduction of Windows Server 2016 the old FRS SYSVOL replication is deprecated. For now (23-06-2017) this means the FRS feature is still there, but you will receive warnings while promoting a Windows 2016 DC and still using FRS. The FRS-feature will be removed in nearby future of new Windows 2016 releases. So migrate your SYSVOL FRS replication to DFSR before introducing new Windows 2016 Domain Controllers to your domain.

Customers don’t know they still using FRS SYSVOL replication after Windows 2008 or higher migration

As a consultant I see a lot of customers, which are running Windows 2008 or higher domains/forest functional levels and unconsciously still using the old FRS-replication technique. The FRS-replication is still in place because their domain/forest had a functional level of Windows 2003 R2 or lower in the past. The customer migrated away from Windows 2003 R2 to a domain/forest functional level of Windows 2008 or higher and didn’t migrate to DFSR. When the domain/forest functional level is raised to Windows 2008 or higher the SYSVOL replication doesn’t automatically upgrades to DFSR. You need to do this manually!

This is also the case when you install a brand new domain with Windows 2012 R2 DC’s and configure the forest/domain functional level to Windows 2003 R2 or lower. In a domain with functional level of Windows 2003 R2 you can introduce Windows 2003 R2 Domain Controllers and since they don’t have DFSR technology the Windows 2008 or higher DC’s fall back to FRS to communicate with the 2003 R2 DC’s in your domain.

Check if you still using FRS replication

Check if you are still using FRS as follows:
  1. On your Domain Controller the “File Replication Service” is present and is running. Startup type: Automatic.
  2. In the Application log events appear in the “File Replication Service” log. Which contains information about FRS replication and the message “The File Replication Service is no longer preventing the computer PBO-DC01 from becoming a domain controller….” is registered after a domain controller reboot.
Example: Visual: The migration process with dfsrmig

The DFSRMIG process has three states:

Preparations

WARNING: Execute the DFS migration on the Domain Controller which has the PDC-emulator role.

INFO: Read the following technet blog for more detailed information about the FRS to DFSR migration: http://blogs.technet.com/b/filecab/archive/2008/02/08/sysvol-migration-series-part-1-introduction-to-the-sysvol-migration-process.aspx

  1. Create a backup of your domain (systemstate)
  2. Make sure you know the Active Directory Restore Mode password. If you are not 100% sure, reset the ADRM password to something you know. You will need this password if you want to restore your Active Directory backup.
  3. Ensure that the domain and forest level is at least Windows 2008 (you can use AD Trusts cpl)
  4. Check your Domain Controllers with DCDIAG and ensure there are no issues
  5. Check Active Directory replication: repadmin /showrepl . You need to ensure that AD replication is OK.
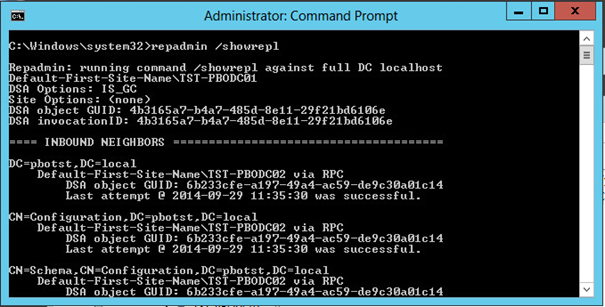
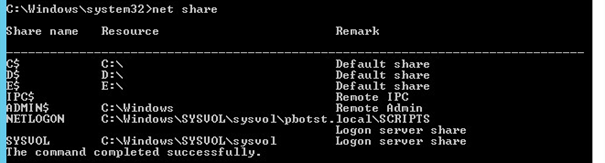
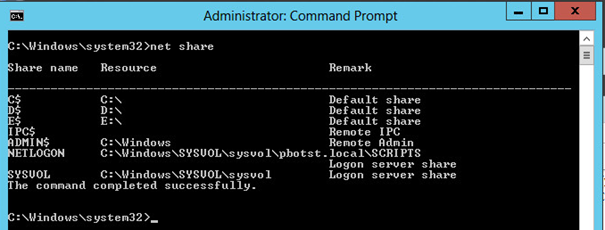
  6. Check if SYSVOL is shared/ready on every domain controller: net share
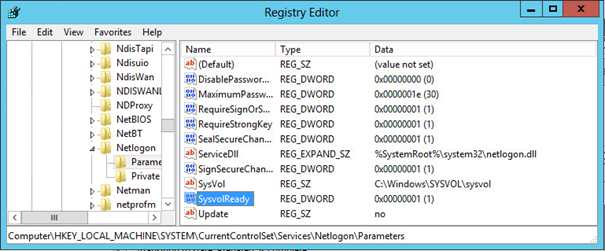
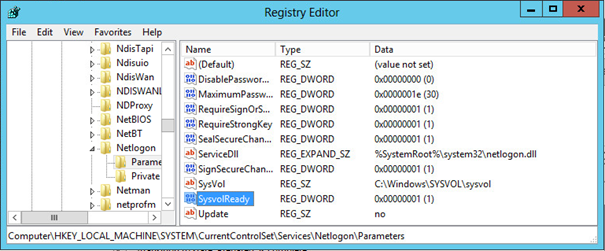
  7. Check every Domain Controller if SYSVOL is ready:  HKLM\System\CurrentControlSet\Services\Netlogon\Parameters\Sysvol [SysvolReady] = 1
  8. Check the current DFSR status and ensure you are not half way a DFSR migration already. Dfsrmig /getMigrationState

  9. Check if the DFS Service is installed on every domain controller:

Phase 1: Migrated to “PREPARED” state

If you have ensured done the preparation and you can fallback to a backup. Your good to go and start the FRS to DFSR migration as follows.

INFO: The prepared state is a state where the DFSR Replication will be introduced parallel of the FRS Replication. When in DFSMig state “PREPARED”, the FRS Replication is leading.


WARNING: The SYSVOL to SYSVOL_DFSR copy is done once, so changes to SYSVOL are not replicated to SYSVOL_DFSR!


=============================================
DFSR has successfully migrated the Domain Controller PBO-DC-01 to the 'PREPARED' state.

TO CONTINUE MIGRATION: If you choose to continue the migration process and proceed to the 'REDIRECTED' state, please note that any changes made henceforth to the SYSVOL share located at C:\Windows\SYSVOL (which is under NTFRS replication) will not be updated in the SYSVOL_DFSR folder located at C:\Windows\SYSVOL_DFSR (which is under DFSR replication). To avoid this possibility of data loss, please make sure no file system changes on the SYSVOL share occur while DCs are migrating from 'PREPARED' to 'REDIRECTED' state.

TO ROLLBACK MIGRATION: If you choose to rollback the migration process and return to the 'START' state, please note that DFSR will no longer be replicating the SYSVOL_DFSR folder and all DFSR information will be removed from the Active Directory.

Additional Information:
Sysvol NTFRS folder: C:\Windows\SYSVOL
Sysvol DFSR folder: C:\Windows\SYSVOL_DFSR
Domain Controller: PBO-DC-01

=============================================
  1. Execute command dfsrmig /setGlobalState 1
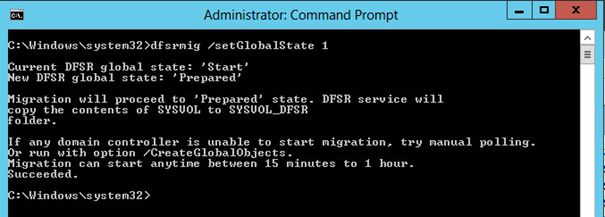
  2. Check the progress with command: dfsrmig /getMigrationState
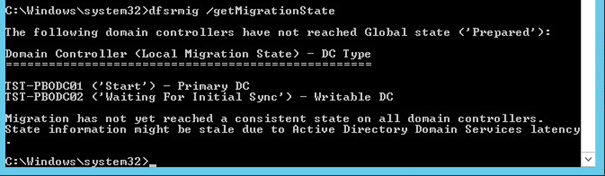
Output – not completed:

Output – Completed:

Phase 2: Migrate to “REDIRECTED” state

INFO: In a redirected state the DFSR will become primary. In this state you still have the opportunity to rollback to FRS replication.

WARNING: There could be data loss when rolling back to FRS replication:

=============================================
DFSR has successfully migrated the Domain Controller PBO-DC-01 to the 'REDIRECTED' state. DFSR is now replicating the SYSVOL_DFSR folder located at C:\Windows\SYSVOL_DFSR.

TO CONTINUE MIGRATION: If you choose to continue the migration process and proceed to the 'ELIMINATED' state, please note that it will not be possible to revert the migration process. Once migration reaches the 'ELIMINATED' state, the SYSVOL folder located at C:\Windows\SYSVOL will be deleted and NTFRS will no longer replicate it. All the NTFRS related information in the Active Directory will be deleted. After that, DFSR will be solely responsible for the SYSVOL share replication process on the Domain Controller PBO-DC-01.

TO ROLLBACK MIGRATION: If you choose to rollback the migration process to the 'PREPARED' state, any changes made after moving to the 'REDIRECTED' state to the SYSVOL_DFSR folder located at C:\Windows\SYSVOL_DFSR (which is currently under DFSR replication) will not be updated in the SYSVOL share located at C:\Windows\SYSVOL (which is under NTFRS replication). To avoid this possibility of data loss post rollback, please make sure that no file system changes on the SYSVOL share  occur while DCs are migrating from 'REDIRECTED' to 'PREPARED' state.


After rollback, NTFRS will replicate the SYSVOL share located at C:\Windows\SYSVOL and DFSR will continue replicating the SYSVOL_DFSR folder located at C:\Windows\SYSVOL_DFSR. However, NTFRS will still primarily be responsible for the SYSVOL share replication process on the Domain Controller PBO-DC-01.

Additional Information:
Sysvol NTFRS folder: C:\Windows\SYSVOL
Sysvol DFSR folder: C:\Windows\SYSVOL_DFSR

Domain Controller: PBO-DC-01

 =============================================
  1. Check if SYSVOL folder is still shared: net share
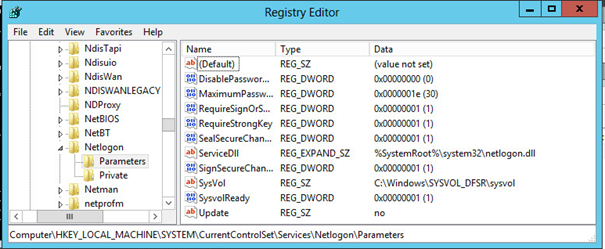
  2. Check if SysvolReady has value 1
  3. Check if the AD replication is still OK: repadmin /showrepl or repadmin /replsum
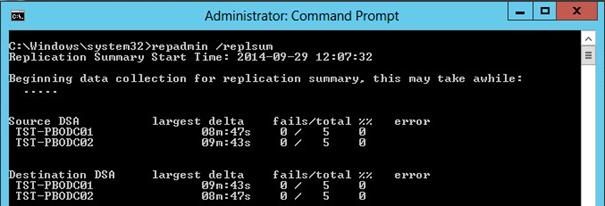
  4. Execute the following command to get to the REDIRECTED state: dfsrmig /setGlobalState 2
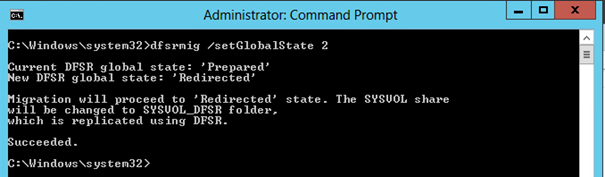
  5. Check the progress with command dfsrmig /getMigrationState
Output – not completed:
Output – Completed:

Phase 3: Migrate to “ELIMINATED” state

WARNING: There is no rollback possibility to FRS when migrated to the ELIMINATED state.
  1. Check if SYSVOL folder is still shared: net share
  2. Check if SysvolReady has value 1
  3. Check if the AD replication is still OK: repadmin /showrepl or repadmin /replsum
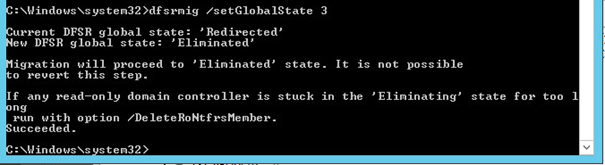
  4. Execute the following command to get to the ELIMINATED state: dfsrmig /setGlobalState 3
  5. Check the progress with command dfsrmig /getMigrationState
Output – Not completed:

Output – Completed:


When done, the following events are in the event viewer:

Friday, June 16, 2017

Fix: PVS Target VMs not booting after upgrade Citrix XenServer 6.5 to Citrix XenServer 7.x

Last week @R_Kossen and I (@pvdnborn) had a project for upgrading a Citrix XenDesktop 7.8 with Citrix XenServer 6.5 to Citrix XenDesktop 7.13 with Citrix XenServer 7.1. During the Citrix XenServer 6.5 to Citrix XenServer 7.1 upgrade we had an issue with the PVS Target devices which I want to share with you.

Before we started the upgrade of XenDesktop and XenServer, we upgraded all the PVS images with: Citrix XenDesktop 7.13 VDA, Citrix Provisioning Services 7.13 Target Device software and XenTools/Management agent for XenServer 7.1. When we successfully finished the upgrade of XenServer 6.5 to XenServer 7.1, we had problems starting all of our VDI and Session Host PVS Target Devices VMs. We had the following issues: 

  • Some PVS Targets didn’t boot at all: “BNIStack failed: network stack could not be initialized”
  • Some PVS Targets did boot very slow and had Realtek network adapters in Windows Device management.
    • XenTools/Management agent didn’t initialize.
During the troubleshoot I realized that this behavior looks very similar to virtual hardware differences between the image and target VM. As preparation we had upgraded the PVS-images in the test environment, which has one XenServer 7.1 host. We decided to export a target device VM from this test XenServer 7.1 pool and import it to our upgraded XS6.5 to XS7.1 production pool. The image with the “BNIStack failed” error was now booting perfectly on the upgraded production host. Even the XenTools/Management agent initialized and we have a XenServer PV Network device instead of the Realtek NIC. Due to this tests we agreed that there is a difference in the virtual hardware configuration between the VMs which is causing boot issues and the imported VM from the XenServer 7.1 test pool.

We noticed a difference of the “Virtualization State” in the XenCenter GUI of the VM which didn’t boot and the VM which booted successfully.

The Virtualization state of the VM with boot issues is “Not able to receive updates from Windows Update”


The Virtualization state of the VM starting correctly is “Able to receive updates from Windows Update”

When connecting with SSH to the pool master, we’ve also noticed a difference between the “hardware-platform-version” and “has-vendor-device” per VM. To get all the properties of the VM use the following command: “xe vm-param-list uuid=<uuid of VM>

The VM-Parameter list of the VM with boot issues:


The VM-Parameter list of the VM starting correctly:


To fix the boot issue, the “has-vendor-device = true” value is needed for all the VMs with boot issues after the XenServer 6.5 to XenServer 7.x upgrade. The “hardware-platform-version” and the “Virtualization state” is also modified by updating the “has-vendor-device” property.

Set the “has-vendor-device” property with the following command: “xe vm-param-set has-vendor-device=true uuid=<UUID of VM>


To get a comma separated list UUID’s of all the VMs and Templates in the pool. Execute the following command on the pool master: “xe vm-list –minimal


Use the comma separated UUID list to set the “has-vendor-device = true” property to all the VMs in the pool.

Be patient: Citrix XenServer 6.5 upgrade to Citrix XenServer 7.1 stuck at 72% for an hour

Last week @R_Kossen and I (@pvdnborn) had a project for upgrading a Citrix XenDesktop 7.8 with Citrix XenServer 6.5 to Citrix XenDesktop 7.13 with Citrix XenServer 7.1. During the Citrix XenServer 6.5 to Citrix XenServer 7.1 upgrade we had an issue which I want to share with you.

For the upgrade to Citrix XenServer 7.1 we used a “Rolling Pool Upgrade” with the XenServer media on a NFS Export. During the Rolling Pool Upgrade the “Completing installation…” stuck at 72%. A “Rolling Pool Upgrade” is always starting with the pool master, so I was worried about this and expected the pool master upgrade will fail.


When switching to another TTY (by pressing ALT+F3), I’ve noticed progress in changing permissions (chmod) of messages files on the filesystem. I think these messages are files of the XenServer performance data which are migrated from the old XenServer 6.5 partition to the new XenServer 7.1 partition. The XenServer hosts of this customer are in production for years now, so there are a lot of messages to “upgrade”. After waiting for about one hour per host the “Rolling Pool Upgrade” completed successful.

If you are experiencing this issue, be patient and press ALT+F3 to see the progress at this 72% stage. Depending on the amount of messages and the production time of your host the duration of this process is between one second and ages. We waited for 1 hour per host and 9 hours for all the hosts in the pool.

At the moment, I didn’t figure out yet how to clean-up these messages in XenServer 6.5 before upgrading to XenServer 7.x.

Wednesday, April 5, 2017

RES WebGuard: This assembly is protected by an unregistered version of Eziriz's ".NET Reactor"!

We are about to finish our XenApp 6.5 to XenApp 7.12 project at a customer. In the new Citrix setup, we are using RES One Workspace 2016 for now. An upgrade to RES One Workspace V10 is planned after go live.

One of the last annoying issues on the issue list is the following pop-up: This assembly is protected by an unregistered version of Eziriz’s “.NET Reactor”!

This message box doesn’t popup every time, so it was hard to reproduce the pop-up for investigating it’s source. After a long troubleshoot and google queries, the project member “Frank Slomp” has found the solution which I want to share with you.

The source of this Eziriz’s message box is RES One Workspace WebGuard Internet Explorer Add-in (RES.WebGuard.WebGuardIE). When contacting RES-Support they mentioned some other customer cases with the same Eziriz’s .NET Reactor message box. They told us that an upgrade to RES One Workspace V10 should solve this issue (did not test this out yet).


Since all the testing by the customer is done on RES One Workspace 2016 we don’t want to upgrade to V10 one day before go live. So I have another solution for users who don't want to upgrade to V10 yet. The customer had website security configured in “Learning mode”, so after disabling this feature the Eziriz’s .NET message box is gone (see Dutch screenshot).


Friday, February 10, 2017

Fixed: Internet Explorer “MfApHook64.dll” crash with RES One Workspace 2016 and Citrix 7.12 VDA

Today I was working on a XenApp 6.5 with RES One Workspace 2015 to XenApp 7.12 with RES One Workspace 2016 project. During this project I had crashes with Internet Explorer on Windows 2012 R2 with crashing module “MfApHook64.dll” version “7.12.0.211”. Screenshot in Dutch:


After troubleshooting I figured out that this problem is caused by RES One Workspace 2016. Somehow RES One Workspace is creating 64-bit Internet Explorer shortcuts instead of the default 32-bit Internet Explorer shortcuts. Due to this, Internet Explorer 64-bit is starting instead of Internet Explorer 32-bit. After contact with RES Support (very good helpdesk) I was facing an issue with RES One Workspace and the Citrix 7.12 VDA. Something is changed within the Citrix 7.12 VDA code. I think the new code for feature “HTML5 video redirection for internal web sites” is breaking RES One Workspace.

RES does have a private fix for this issue, but isn’t suitable for production environments at the moment (10-02-2017). So the only workaround is downgrade the VDA to 7.11 until RES is releasing a public fix for this issue.   


Update - 20 March 2017: RES Software released V10 of RES One Workspace. This version fixes the issue.

Friday, November 11, 2016

Rumour: Technical limitations Citrix Provisioning Service Datacenter edition in combination with Citrix XenApp and XenDesktop

Since the release of XenApp/Desktop 7.8 a rumour was spread about some technical limitations for Citrix Provisioning Services when Citrix Provisioning Services Datacenter licenses are used in combination with Citrix XenApp and XenDesktop. 

The rumour is a follows: When your Citrix XenApp and Citrix Provisioning Services is upgraded to 7.8 or higher and Citrix Provisioning Services Datacenter licenses are used, the Citrix Provisioning Services Target Devices are shut down when the XenApp VDA is installed. 

The Citrix UELA describes that usage of Provisioning Services Datacenter edition is not allowed in a XenApp or XenDesktop environments. This blog only covers the technical discussion not the EULA part.

Due to this rumour I was very cautious for upgrading customers to 7.8 and higher. Upgrades of Citrix Current Release versions is something what I do very often, so I need to be sure this rumour is true or false. I decided to install a Citrix XenApp Advanced environment with Citrix Provisioning Services Datacenter licenses in my home lab. For this test I started with XenApp 7.8 and Provisioning Services 7.8 because the rumour tells me that this is the version when all the trouble is started. After testing 7.8 I’ve upgraded both XA and PVS to 7.9 and finally to 7.11.

After testing, my conclusion is: The rumour is not true! There are no sudden PVS shutdowns or strange error messages when using Citrix Provisioning Services Datacenter licenses in combination with XenApp Advanced.

Screenshots: XenApp 7.8 and Provisioning Services 7.8 test

The test setup is as follows:

Citrix Backend, one Windows 2012 R2 Server with roles:
  • Citrix Licensing Server 
  • Citrix XenApp Delivery Controller 7.8
  • XenApp Advanced Concurrent licenses
  • Citrix Provisioning Services 7.8
  • Citrix Provisioning Services licenses

Citrix Worker, one PVS Streamed Windows 2012 R2 Session Host:
  • Citrix XenApp 7.8 VDA
  • Citrix Provisioning Services 7.8 Target Device Software
  • VM: Hyper-V Gen2
  • PVS Boot: TFTP UEFI

Citrix Desktop Delivery Controller 7.8

Citrix License Administration Console

Citrix Provisioning Services Server 7.8

Citrix XenApp 7.8 VDA - Session Host

User ICA Session to XenApp 7.8 VDA

Screenshots: XenApp 7.9 and Provisioning Services 7.9 test

The test setup is upgrade to the following setup follows:

Citrix Backend, one Windows 2012 R2 Server with roles:
  • Citrix Licensing Server 
  • Citrix XenApp Delivery Controller 7.9
  • XenApp Advanced Concurrent licenses
  • Citrix Provisioning Services 7.9
  • Citrix Provisioning Services licenses

Citrix Worker, one PVS Streamed Windows 2012 R2 Session Host:
  • Citrix XenApp 7.9 VDA
  • Citrix Provisioning Services 7.9 Target Device Software
  • VM: Hyper-V Gen2
  • PVS Boot: TFTP UEFI

Citrix Desktop Delivery Controller 7.9

Citrix License Administration Console

Citrix Provisioning Services Server 7.9

Citrix XenApp 7.9 VDA - Session Host

User ICA Session to XenApp 7.9 VDA

Screenshots: XenApp 7.11 and Provisioning Services 7.11 test

The test setup is upgrade to the following setup follows:

Citrix Backend, one Windows 2012 R2 Server with roles:
  • Citrix Licensing Server 
  • Citrix XenApp Delivery Controller 7.11
  • XenApp Advanced Concurrent licenses
  • Citrix Provisioning Services 7.11
  • Citrix Provisioning Services licenses

Citrix Worker, one PVS Streamed Windows 2012 R2 Session Host:
  • Citrix XenApp 7.11 VDA
  • Citrix Provisioning Services 7.11 Target Device Software
  • VM: Hyper-V Gen2
  • PVS Boot: TFTP UEFI

Citrix Desktop Delivery Controller 7.11

Citrix License Administration Console

Citrix Provisioning Services Server 7.11

Citrix XenApp 7.11 VDA - Session Host

User ICA Session to XenApp 7.11 VDA