Friday, November 11, 2016

Rumour: Technical limitations Citrix Provisioning Service Datacenter edition in combination with Citrix XenApp and XenDesktop

Since the release of XenApp/Desktop 7.8 a rumour was spread about some technical limitations for Citrix Provisioning Services when Citrix Provisioning Services Datacenter licenses are used in combination with Citrix XenApp and XenDesktop. 

The rumour is a follows: When your Citrix XenApp and Citrix Provisioning Services is upgraded to 7.8 or higher and Citrix Provisioning Services Datacenter licenses are used, the Citrix Provisioning Services Target Devices are shut down when the XenApp VDA is installed. 

The Citrix UELA describes that usage of Provisioning Services Datacenter edition is not allowed in a XenApp or XenDesktop environments. This blog only covers the technical discussion not the EULA part.

Due to this rumour I was very cautious for upgrading customers to 7.8 and higher. Upgrades of Citrix Current Release versions is something what I do very often, so I need to be sure this rumour is true or false. I decided to install a Citrix XenApp Advanced environment with Citrix Provisioning Services Datacenter licenses in my home lab. For this test I started with XenApp 7.8 and Provisioning Services 7.8 because the rumour tells me that this is the version when all the trouble is started. After testing 7.8 I’ve upgraded both XA and PVS to 7.9 and finally to 7.11.

After testing, my conclusion is: The rumour is not true! There are no sudden PVS shutdowns or strange error messages when using Citrix Provisioning Services Datacenter licenses in combination with XenApp Advanced.

Screenshots: XenApp 7.8 and Provisioning Services 7.8 test

The test setup is as follows:

Citrix Backend, one Windows 2012 R2 Server with roles:
  • Citrix Licensing Server 
  • Citrix XenApp Delivery Controller 7.8
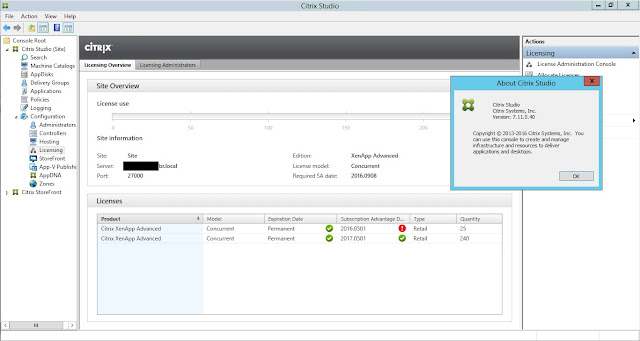
  • XenApp Advanced Concurrent licenses
  • Citrix Provisioning Services 7.8
  • Citrix Provisioning Services licenses

Citrix Worker, one PVS Streamed Windows 2012 R2 Session Host:
  • Citrix XenApp 7.8 VDA
  • Citrix Provisioning Services 7.8 Target Device Software
  • VM: Hyper-V Gen2
  • PVS Boot: TFTP UEFI

Citrix Desktop Delivery Controller 7.8

Citrix License Administration Console

Citrix Provisioning Services Server 7.8

Citrix XenApp 7.8 VDA - Session Host

User ICA Session to XenApp 7.8 VDA

Screenshots: XenApp 7.9 and Provisioning Services 7.9 test

The test setup is upgrade to the following setup follows:

Citrix Backend, one Windows 2012 R2 Server with roles:
  • Citrix Licensing Server 
  • Citrix XenApp Delivery Controller 7.9
  • XenApp Advanced Concurrent licenses
  • Citrix Provisioning Services 7.9
  • Citrix Provisioning Services licenses

Citrix Worker, one PVS Streamed Windows 2012 R2 Session Host:
  • Citrix XenApp 7.9 VDA
  • Citrix Provisioning Services 7.9 Target Device Software
  • VM: Hyper-V Gen2
  • PVS Boot: TFTP UEFI

Citrix Desktop Delivery Controller 7.9

Citrix License Administration Console

Citrix Provisioning Services Server 7.9

Citrix XenApp 7.9 VDA - Session Host

User ICA Session to XenApp 7.9 VDA

Screenshots: XenApp 7.11 and Provisioning Services 7.11 test

The test setup is upgrade to the following setup follows:

Citrix Backend, one Windows 2012 R2 Server with roles:
  • Citrix Licensing Server 
  • Citrix XenApp Delivery Controller 7.11
  • XenApp Advanced Concurrent licenses
  • Citrix Provisioning Services 7.11
  • Citrix Provisioning Services licenses

Citrix Worker, one PVS Streamed Windows 2012 R2 Session Host:
  • Citrix XenApp 7.11 VDA
  • Citrix Provisioning Services 7.11 Target Device Software
  • VM: Hyper-V Gen2
  • PVS Boot: TFTP UEFI

Citrix Desktop Delivery Controller 7.11

Citrix License Administration Console

Citrix Provisioning Services Server 7.11

Citrix XenApp 7.11 VDA - Session Host

User ICA Session to XenApp 7.11 VDA


Wednesday, August 24, 2016

How to: Citrix Machine Creation Services and Microsoft Azure Resource Manager

In January of this year I wrote a how-to blog about Machine Creation Services and Microsoft Azure Classic. Citrix has updated their Machine Creation Services to support Microsoft Azure Resource manager. At the time of writing this MCS update is only available for customers who are using “Citrix Cloud | XenDesktop and XenApp Services”. Those who have a traditional on-prem XenDesktop 7.7, 7.8 or 7.9 set-up only have the option for Microsoft Azure Classic at the moment.

This blog is a step-by-step guide about how to provision machines in Microsoft Azure using Machine Creation Services. This blog describes the creation of a hosting connection to Microsoft Azure and making a new Machine Catalog with three new Windows 2012 R2 Session Host machines based on the Golden Master.


Citrix XenDesktop configuration
For this guide I have setup a basic Citrix Cloud setup with IaaS VMs in Microsoft Azure (Resource manager):
  • Citrix Cloud | XenDesktop and XenApp Services
  • Citrix Cloud Connector Virtual Machine
  • Established connection between Citrix Cloud and Citrix Cloud Connection (Resource location and Domain connection)
 
Master Image Configuration
The Master image, used in this guide, is configured as follows:
  • Azure Resource Manager Virtual Machine A2
  • Azure virtual network name "VN_172.16.0.0-24"and Subnet name "SN_172.16.1.0-24"
  • Windows 2012 R2 Session Host
  • Citrix XenDesktop 7.9 VDA
  • LibreOffice 5.2
  • Notepad++
  • VLC Media player
Creating Azure Hosting connection in Citrix Cloud | XenDesktop and XenApp Services
 
1. Browse to https://portal.azure.com and click Subscriptions. Write down your Azure Subscription ID


2. Browse to https://citrix.cloud.com and go to XenApp and XenDesktop Services


3. Click Manage and go to Hosting. Click Add Connection and Resources

4. Select connection type Microsoft Azure
5. Enter your Azure subscription ID (step 1) and give the connection a name. Then click Create new..


6. Login with your Microsoft Account which has access to your Microsoft Azure subscription


7. Verify the login. If you have a problem (like me) sending a security code, edit your Microsoft account for mobile app “Microsoft Account” verification (https://account.live.com/proofs/Manage)


8. Accept Citrix XenDesktop permissions


9. Click Next


10. Select the Azure region for this hosting connection and click Next


11. Select your virtual network and subnet, click Next


12. Click Finish


13. The hosting connection to Microsoft Azure Resource Manager is completed


Create new Machine Catalog
Like using Citrix Machine Creation Services with on-premises Hypervisor we need to install a master VM and shut it down. There is no need to create a snapshot (hypervisor) or capture (azure classic). In this example I’ve used master virtual machine AzureCTXGM.
1. Install your Golden Master VM with software and Citrix VDA. When finished shut the machine down and power off (deallocated)


2. Browse to Citrix Cloud | XenApp and XenDesktop Services and go to Machine Catalogs. Click Create Machine Catalog


3. Select type of Operating System (in this example Server OS) and click Next

4. Select Machines that are power managed and select Citrix Machine Creation Services, click Next

5. Select the VHD of the Golden Master VM and click Next

6. Select the destination storage type for your provisioned virtual machines and click Next


7. Select the amount of machines (i.e. 3) to create and select the Microsoft Azure Machine size (i.e. Standard_A2). Click Next


8. Select the network card and associate it with the Azure Subnet name for your Citrix Machines (i.e. SN_172.16.1.0-24), click Next

9. Select Create new Active Directory accounts. Then select the OU for the new machines. And fill in an Account naming scheme for the new machines (use ## for auto increment numbers)


10. Enter your domain account credentials, and click next (this account is used to create the computer accounts)

11. A summary is displayed. Fill in a Machine Catalog name and a Machine Catalog description for administrators and click Finish

12. The Machine Catalog is copying the master image to a base disk


13. The Virtual Machines are created


14. A new storage account is created on Azure
15. While MCS is deploying the virtual machines, a preparation VM with VHD is temporary created on Azure
16. When MCS finishes, the following VHDs are created for 3 VMs (ARM-XDSH-##)

 
You are now able to create a Delivery Group.
 

Tuesday, May 24, 2016

In-place-upgrade and installation of Citrix XenDesktop/XenApp 7.8 VDA on Windows 2012 R2 fails “Ica_TS.msi”

Today I unexpectedly had a challenge upgrading a Citrix XenApp 7.6 VDA to Citrix XenDesktop 7.8 VDA on Windows 2012 R2. During the in-place-upgrade of the 7.8 VDA or a reinstallation of the 7.8 VDA, the installation fails at the section Virtual Delivery Agent:

The XenDesktop Installation log (opened if Show error log is enabled) is showing the following error:

13:20:54.8513 $ERR$ : XenDesktopSetup:Installation of MSI File 'IcaTS_x64.msi' failed with code 'InstallFailure' (1603).
13:20:54.8513 $ERR$ : XenDesktopSetup:InstallComponent: Failed to install component 'ICA for Remote Desktop Services'. Installation of MSI File 'IcaTS_x64.msi' failed with code 'InstallFailure' (1603).
13:20:54.8523 $ERR$ : XenDesktopSetup:Recording installation failure. Installation of MSI File 'IcaTS_x64.msi' failed with code 'InstallFailure' (1603).
 
The following error is in the Application log of the Windows Eventviewer:
 
Product: Citrix HDX TS (retail) -- Error 1911. Could not register type library for file C:\Program Files\Citrix\Euem\Service\SemsComLibrary.tlb. Contact your support personnel.
 
 
To solve this issue, uninstall the following Windows updates prior updating or installing the Citrix XenDesktop 7.8 VDA:
After the VDA upgrade/installation it is save to reinstall the KB updates again!

Monday, May 23, 2016

“Failed to launch the resource ‘XenDesktop 7.6 $S1-1’as it was not found.” After upgrade to StoreFront 3.5

This weekend I was upgrading Citrix StoreFront 2.6 to Citrix StoreFront 3.5. The in-place-upgrade was working out of the box and finishes successfully at once! When testing the upgrade by logging in with ThinClients, we cannot connect to any XenApp 7.6 resource (PubApps and PubDesktops). All the XenApp servers are in a Registerd state to the Desktop Delivery Controller. When investigating the eventviewer of the StoreFront servers I found the following Warning message: “Failed to launch the resource ‘XenDesktop 7.6 $1-1’ as it was not found”
After some investigation I’ve found out that Citrix StoreFront 3.5 cannot handle spaces and dot characters in the Display Name of Controllers. My customer has XenDesktop 7.6 as display name containing spaces and a dot:
Renaming the Delivery Controller Display name to XenDesktop solved the problem:
Attention is needed for users which have added resources in their Citrix Receiver. After renaming the Delivery Group Display name, they should add the resource again to their receiver.